Showing posts with label Servlets. Show all posts

Form Based Applications

 Form Based Applications in Servlets:

Generally in many web applications we might have gone through many forms like registration, login, etc.., in those forms we might have entered values and clicked on the buttons like SUBMIT/REGISTER/LOGIN. After we click the button what is happening there. How we are getting the response. Let us see that now.

Form based applications are responsible to capture the data from the end user and send it to the server. Let us see an example, the following is the form that takes the data from the end user.
form base application in servlets
Form based application in servlets that takes the data from webpage
The following is the servlet that captures the data from the form and display the entered values on the webpage.

Form Based Applications
form based application


Introducing doGet() and doPost() Methods

These two methods acts as Service() method in servlet. In project we can use service() or doGet() or doPost(). Now let us see doGet() and doPost() in detail.

doGet(): 

This method indicates which operation has to be carried out by the server. This is the default method sent by the client to the server. In get(), the data that client wants to send to server will get appended to url. But the url limits to 1024 characters. Let us see with example. When we type the url in the address bar and once if we press Enter, by default get request goes to the server. 

doGet()  example

In the above figure you can see the login form. Since this is get() when we enter the username and password and click on Enter/Login button, both the username and password gets appended to the url as follows.

doGet() example.

You can observe the username and password appended to the url. This is the major disadvantage of get() method. To overcome this we use Post().

doPost():

 This method is also used to execute the resource in a server. When we use Post(), the browser/client sends the data to the server through request body. This is the only difference between Get() and Post(). Post request is highly used for secured web pages.                             


Integrating JDBC in Servlet Programming

Now, let us see how to integrate JDBC in Servlets. Generally in web based application we will come through this type of programs. In some websites you might have come across some registration forms, in such registration form, when you enter the data and once you click on the SUBMIT button the entire data is stored into the database. In such cases these programs are used. 

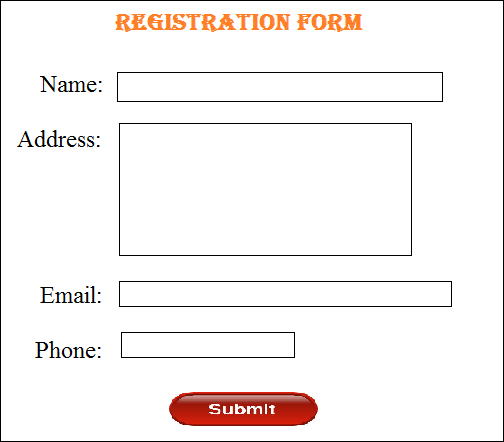
Now, let us assume that the following is the registration form in which we are ought to enter the details.


Registration form
Registration form
 

The following program sends the data from registration form to the database.


program sends the data from registration form to the database
Program to send data from registration form to database
 The following is the program to retrieve the data from servlet and display to the client.

program to retrieve the data from servlet and display


With this we have came to know how to integrate JDBC in servlets.


Servlet Programming

To simplify the development of servlets, SunMicroSystems has given a predifined classes. They are "GenericServlet" and "HttpServlet". The following figure shows the relationship between classes.


relationship between servlet classes.


From the above figure we can understand that Servlet is an Interface which was implemented by GenericServlet class. And HttpServlet is the sub-class of GenericServlet class. Both HttpServlet and GenericServlet classes are abstract. 

People say that there are three ways to develop the servlets. But according to SunMicroSystems, it is recommended to develop a servlet based on HttpServlet class, so that we can remove the redundant code of init(), destroy(), getServletConfig(), getServletInfo(). The following is the servlet based on HttpServlet. 

httpServlet
servlet based on HttpServlet


When we observe the above program, it doesn't have a main() method. Generally servlets doesn't consists a main() method, because servlets are executed by server not by JVM. At the same time in the above program we can see System.out.println("we are in First Servlet"). Since servlet program is executed by server the message "we are in First Servlet" will be displayed in server, which we cannot see. So, in servlet if we would like to display a message, it should be placed in PrintWriter object. The following program shows you, how to use PrintWriter object.

program shows you, how to use PrintWriter object


First Step Towards Servlet Programming

Servlet is an API used to develop web based Application. The following are the important packages available in servlet API. 
  • javax.servlet
  • javax.servlet.http
  • javax.servlet.annotation (Available from servlets 3.0 onwards)


The following are the most important Interfaces and classes in each package
Interfaces and classes of Servlet package
Fig1: Important Classes and Interfaces of Servlet API
Servlet: A servlet is a java program which provides the implementation of Servlet Interface directly or Indirectly.

Procedure to Develop a Servlet Program: 
Step 1: Develop a class which provides the implementation of the Servlet interface. The following figure shows you the servlet program, which implements servlet interface.
 
Servlet program
Fig: FirstServlet program

Step 2: We have to compile the servlet program. To compile we need to set the classpath to the jar file which provides the implementation of Servlet API. The name of the jar file which provides the implementation varies from server to server. In case of Tomcat, we use "Servlet-api.jar".
Step 3: Every Servlet must be configured in the project.
  1. Copy the .class file into classes folder of WEB-INF.
  2. Configure the servlet into web.xml file. The following is the web.xml file for the above FirstServlet program.
web.xml file
Deployment Descriptor

Step 4: Deploy the project. (place the project in to tomcat server (webapps) )
Step 5: Use the following URL to execute the servlet 

  • http://localhost:8080/webapps/<url-pattern>(given in web.xml file)

            Whenever we deploy a project, Server searches for web.xml file and store it in JVM's Memory. When the client sends the request(in the form of HTTP Request Format) to server, the server receives the request and creates two objects Request and Response. Now the server opens HTTP Request Format, read the data and store it in Request object. Then the server creates the servlet object. After creating Servlet object the server supply Request and Response objects as parameters to service() method. Service method returns the data to Response object. Now the server opens the Response object, read the data and sends the response to the client in the form of HTTP Response Format. Now the server deletes Request and Response objects.   


Procedure to develop a Web Application

 There are two types of Web Applications. They are:
  • Static Web Application 
  • Dynamic Web Application
To develop Static web application we use HTML, JavaScript whereas to develop Dynamic web applications we use Servlets and JSP's. If you want to develop a web based application we need to follow certain rules. 

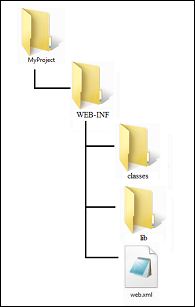
Step1: Create a folder whose folder name is project name. Make sure that is contains no spaces. See the following figure, there is no space between My and Project.


Step2: Inside the above folder create another folder whose name is "WEB-INF". This is a private folder, the data in this folder can be accessed only by the server.

Step3: Inside the WEB-INF folder create another two folders whose names are classes and lib. Along with these to folders create a xml file whose name is web.xml. This web.xml file is called as "Deployment Descriptor".

The entire project structure is as shown below: 
Project Structure
Step 4: All HTML files and images must be placed inside project folder and outside WEB-INF folder. 
Step 5: The web based application must be deployed on the server.              
                                      

Understanding HTT Protocol

Hyper Text Transfer Protocol is the only protocol used for the communication between the client and the server. HTTP is a specification, majorly it is divided into two parts, they are:
  • HTTP Request Format
  • HTTP Response Format

HTTP Request Format:

            This is the format used by the client to send request to the server. Majorly the client software(Browser) sends the request to the server in the following scenarios:
  • When we type the URL and click on Enter.
  • When we click on any button in the web page.
  • When we click on the hyperlinks.
This HTTP Request Format is divided into four parts. The following figure shows the HTTP Request Format.

HTTP Request Format
Fig1: HTTP Request Format

Initial Request Line:

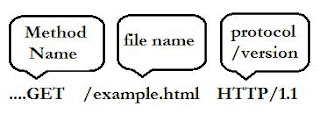
          This line contains the Method name , Resource name and the Protocol/version. The following figure shows the Initial Request Line. 

Initial Request Line block diagram
Fig2: Initial Request Line block diagram
There are so many methods available in JEE api. They are as follows:
  1. GET
  2. POST 
  3. PUT
  4. DELETE
  5. TRACE 
  6. LOCATE
  7. HEAD
The default method that the client software(Browser) uses to communicate with server is GET.

  • Resource Name is the file name, which we want to be executed by the server. 
  • Protocol / version field gives the information about the protocol that is being used by the client to communicate with server.
The original Initial Request is as follows: 
Original initial request line
Fig3: Original initial request line

Zero or More no.of Headers:

The header is used to send extra information to the server. The following is the header format.

HTTP Request Format Header Format
Fig4: Header Format
Among all the headers, there are two most important headers, they are:
  • User-Agent (Indicates which browser program has sent the request to server)
  • Accept Language (Specifies which language is acceptable by the client, based on this server sends the response )

Blank Line:

This line is used just to specify the gap between the headers and the request body.

Request Body:

This is the optional part of the Http Request Format. Let us discuss about this in Post() method.

HTTP Response Format:                                      

        This is the format used by the server to send the Response to the client. This format is divided into four parts as follows:

 Http Response Format
Fig5: Http Response Format

Initial Response Line:

This is again divided into three parts as follows:

Initial Response Line
Fig6: Initial Response Line
Protocol/version:  Indicates the protocol used by the server to send the response to the client.
Status Code: Indicates the status code of the request send by the server. The following are the status codes given by HTTP. 
100 to 199 - Information
200 to 299 - Success
300 to 399 - Redirect
400 to 499 - Requested Resource not available.
500 to 599 - Failed to execute the Request.
  • If the server want to send the information to client then it sends 1XX.
  • If the server is able to successfully process the request, it returns a status code 2XX.
  • When the client send the request to a server, and if that server want us to check in another server, the server sends a status code 3XX to the client.
  • If the requested resource is not available in the server, server will give 4XX status code.
  • If the resource is available and if the server was unable to process the request then it sends 5XX Status code.

Status Message: Every response sent by the server will have a Status Message. 
Ex: 200 - Success
       404 - Not Found

Zero or More number of Headers: 

Among all the headers Content Type is the only header which play a major role: 

  • Server sends this header to client to specify which type of content is being sent. Based on this the client displays the output.

Blank Line: 

This is same as in the Request format.

Response Body: 

 The data that server wants to send to the client will be added to the Response Body. The client receives the response body, formats it according to the tags and display to the user. 

As of now we came to know about the HTTP Request and HTTP Response Formats. Now let us discuss about the methods that are used by the server. Method indicates the operation that has to be carried by the server.   


Get(): This method is used to send the HTTP request to server and handle it. 
Post(): This method also used to send the HTTP request to server and handle it.

Differences between Get() and Post(): 

When ever the user enter some data in the browser and click on submit button, it is the responsibility of the client to send the data entered by the user to the server. Suppose let us consider a login page. when the user enters the username and password and clicks on SUBMIT button, client sends the username and password to the server. 

In the above example if we use Get() method, then the username and password is appended to the URL and sent to the server. 

  • Ex: http://example.html?uname=graduate&pwd=cse

If the browser displays the URL as above everyone is able to see the data entered by the user, and at the same time get() method limits the URL characters to 1024. These two are the dangerous limitations of GET(). To overcome these two disadvantages, we should use POST().

When we use post() method, the data entered by the user is appended to the Request Body of the HTTP Request Format, so that no one can see the data entered by the user. 

Put(): This method is used to place the resource from client to server. Because of security reasons non of the server supports put().

Delete(): This method is used to delete a resource available in the server. Because of security reasons non of the server supports put().

Trace()/Locate(): These methods are used when client wants to find the resources in server.  Because of security reasons non of the server supports put().

Head(): When the client wants to know some info about the server, then the client sends Head request to the server. Server process the request and sends the response by using status code 1XX.   

Statefull & Stateless Protocols: 

Based on their behavior Protocols are divided into two parts, they are: 
  • Statefull Protocol
  • Stateless Protocol 

Statefull Protocol: 

 A statefull protocol is the one which remembers the entire conversation between server and the client. We require huge amount of memory for statefull protocols. 
Ex: FTP, SMTP, UDP, TCP/IP etc.., 

Stateless Protocol: 

  A stateless protocol is the one which do not remember the conversation between the client and server. These type of protocols require less amount of memory.
Ex: HTTP

HTTPS(Hyper Text Transfer Protocol Secured):

When we use HTTP we will face lot of security related problems, i.e., anybody can observe the username and password sent from the client to server. To resolve this problem we use HTTPS protocol. This protocol uses encryption algorithms, to encrypt the data. 
    For example when we open any browser and, we type www.gmail.com in the address bar, and press enter. After a small amount of time we can see the url converting to https:/www.gmail.com.             

Introduction to Servlets

           We use Servlets to develop the web based applications. To run a web based application we need a server and a client. In a web based application Client sends the Request to the server, the server receives that request, processes it and send the Response to the client. So, in a web based application both server and client are equally important. The following figure shows you the client and server architecture. 


Client Server Architecture
Fig1: Client Server Architecture
If the client and server want to communicate with each other they must use same protocol. There are so many protocols available to us. Some of them are: 
  • TCP/IP
  • SMTP
  • UDP
  • FTP 
  • HTTP etc...,
Among all these protocols, HTTP is the only protocol which is used in the web applications.

Disadvantages of Standalone Application: 


Standalone application is the one that can run offline. The following are the disadvantages of the Standalone applications:
  • As the Standalone application runs on the client computer, we need to install it in all the computers. 
  • We will have a lot of maintenance related problems, i.e., whenever we want to change the project we need to change it  in every client computer.
  • A standalone application consumes the resources of the client computer.
  • Only some persons know how to install these application and configure them.