As of now we have seen how to store data into the Database using Hibernate Application. Now let us see, how to retrieve the data from the Database. To retrieve the data from the database, Hibernate uses two methods, they are

Showing posts with label Hibernate. Show all posts
Showing posts with label Hibernate. Show all posts
Storing data into DataBase using Hibernate
To store data into Database using Hibernate Framework we use the following three methods.
- save
- persist
- save or update
- serializable save(Object object)
- void persist(Object object)
The following is the Hibernate application which inserts the data into Database. Here we are using save().
 |
| Program to Insert values into database using Hibernate |
Analyzing Hibernate Application
We have seen how to write a Hibernate Application, which inserts the values into DataBase Server. Now let us know what each step is doing in the background.
Step1: When we create the Configuration object a plain java object will be created. This configuration object stores all the configuration details. Initially when we create the object no data is available in that.
Step2: When we call cfg.configure() it searches for hibernate.cfg.xml file(Configuration file) in the WEB-INF folder. If the Configuration file is not found it throws an exception "org.hibernate.HibernateException/hibernate.cfg.xml not found".
- If the configuration file is found, parser will validate the xml file. If the file is not valid parser throws an exception "could not parse the xml file". If the xml file(configuration file) is valid configure() method gets the values of Driverclass, url, username, password, and the information about Hibernate Mapping Files. Then it reads the contents from Hibernate mapping files and stores the entire data into Configuration Object(JVM's Memory).
- Now the connection pool program acquires connections from DBServer. Now, buildSessionFactory() picks the connection from the connection pool and establish the connection with DBServer.
- Now it will check weather the required tables are available or not. If the tables are not available buildSessionFactory() creates the table.
- It is the responsibility of the buildSessionFactory() to create and process all the query operations(CURD operations) for each table. After processing the buildSessionFactory() returns the connection to the connection pool.
- As the buildSessionFactory method is doing more work, it is recommended to call this method only once in the life cycle of the project.
Step4: When we open the session object by using sf.openSession().
- Hibernate creates an object which is similar to hashtable object. We call this object as First Level Cache.
- Hibernate associates this object with Session Object.
- This First level cache is available until the Session object is closed. Only the session object can access the data from First Level Cache.
- Opening the session object is nothing but getting the connection object. This method is not an expensive operation. It is always recommended to open a new session object whenever it is required.
Step6: Create POJO class object corresponding to the table. When the object is created all the instance variables are initialized with default values.
 |
| Fig: POJO Class object in which values are initialized with null values |
 |
| Fig: variables initialized with values |
- Ex: hsession.contains(e);
Step9: When we call tx.commit(), hibernate checks for any objects in the First Level Cache which are waiting for an operation to be taken care. If the objects are available hibernate finds, to which POJO class these objects belongs to(Hibernate internally uses getClass() to find the class).
- Now hibernate finds to which table this POJO class is mapped, and from that table it gets the registration code. Based on this code it has got the query form the JVM's memory. Now hibernate get the data from the POJO class and supply as the input to the query. This query is added to batch object and send to the DBServer.
- By default hibernate will not display the query sent to the DB. If we want to see the query we have to add a property in the hibernate configuration file. The following is the property to show SQL queries.
<property name="show-sql">true</property>
Step10: When we call hsession.close(), the connection is returned to the connection pool as well as it removes the First Level Cache object.
Step11: When we call sf.close(), it removes second level cache as well as returns all the connections from the connection pool to DBServer.
First Hibernate Application
First let us know, what are the important interfaces ans classes. The following are the most important interfaces and classes.
The following are the steps which will be used to develop Hibernate Application:
 |
| Fig: Important interfaces and classes in Hibernate |
The following are the steps which will be used to develop Hibernate Application:
- Create Configuration object by using configuration class.
- Call the configure() method using the above configuration object.
- Get SessionFactory object by using configuration object by using "buildSessionFactory()" method.
- Get Session object using SessionFactory object, by calling openSession() method.
- Get Transaction object by calling the method beginTransaction().
- Create the POJO class object corresponding to the table.
- Store the data in the form of object.
- Ask Hibernate to perform CURD operations.The following are the curd operations. The following are the operations.
- save() // create
- update() // update
- load() // select /Retrieve
- delete() // delete
- End the Transaction by calling commit() and rollback().
- Close the session object.
- Close the SessionFactory object.
 |
| Fig: Hibernate application to Insert Record into Employee table |
Towards Hibernate Application
To develop a Hibernate application first we need to create the user in Database and assign some privileges. The following commands helps you to create the user in Database.
Grant connect,resource to HIBER;
Grant create sequence to HIBER;
Note: There is no rule saying that POJO class names and table names should be same.
The POJO class must follow the following rules:
Step1: Start MyEclipse IDE pointing to workspace folder.
Step2:Configure MyEclipse IDE to interact with the Database Server.
Step3:Create a java project and add a package to it.
Step4: Add Hibernate capabilities to the above project. To do this select Project --> MyEclipse in menu bar --> select Hibernate capabilities.
Step5: The above step displays a dialogue box, choose the required jar files to be added.
Step6: Choose new Hibernate Configuration file and click on Next.
Step7: Choose the DB driver and provide url, username and password click on Next.
Step8: Choose the package and click on Finish.
Step2: Select the DB --> open --> Expand DB --> Expand User(The user you have created in Database) --> Expand Table --> select the required tables --> Right click --> Select Hibernate reverse engineering option.
Hence, as of now we have created Configuration file, POJO classes and HBM files. Now our responsibility is to develop a java program. Let us see that.
- Login to the DBServer using administrative username and create the user as follows:
Grant connect,resource to HIBER;
Grant create sequence to HIBER;
- Now create a table with primary key.
- Hibernate Configuration file
- POJO classes (Plain Old Java Object)
- Hibernate Mapping Files (hbm)
Hibernate Configuration File:
Generally every Framework uses the Configuration file, this is the starting point of any framework. Generally Configuration files are .xml files or properties files. In Hibernate we use Hibernate.cfg.xml as the configuration file. It contains the data that is required to communicate with database server. The following figure shows the contents of configuration file.
 |
| Hibernate Configuration File |
POJO Classes:
Generally in hibernate we represent the database records in the form of objects, this can be done by using java programs, Because of this reason we have to develop a couple of java programs. These program contains instance variables, setXXX() and getXXX() methods. Developing these programs are easy because of this reason they are called as POJO(Plain Old Java Object). The no.of POJO classes are based on the no.of tables present in the database server. Suppose if we have two tables, we need to develop two POJO classes. Let us think we have emp and product tables in our database, then we need to develop two POJO classes.
- Emp.java
- Product.java
Note: There is no rule saying that POJO class names and table names should be same.
The POJO class must follow the following rules:
- It must contain a default constructor.
- It must be placed inside a package.
- The POJO class supports properties,setXXX() and getXXX() methods are called as Properties.
HBM Files:
To work with Hibernate we have to develop Hibernate Mapping Files. These files contains the information about which POJO class is mapped with which table and which property is mapped with which column. The following is the sample POJO class.
Procedure to generate Configuration file using MyEclipse:
The following are the steps to generate configuration file.Step1: Start MyEclipse IDE pointing to workspace folder.
Step2:Configure MyEclipse IDE to interact with the Database Server.
Step3:Create a java project and add a package to it.
 |
| Fig: Adding Package to the Project |
 |
| Fig: Adding Hibernate capabilities to Project |
 |
| Fig: Add required jar files |
 |
| Fig: Configuration file name |
 |
| Fig: Choose the driver |
Procedure to generate POJO classes and HBM files:
Step1: Go to MyEclipse DB explorer perspective and establish the connection with Database server.Step2: Select the DB --> open --> Expand DB --> Expand User(The user you have created in Database) --> Expand Table --> select the required tables --> Right click --> Select Hibernate reverse engineering option.
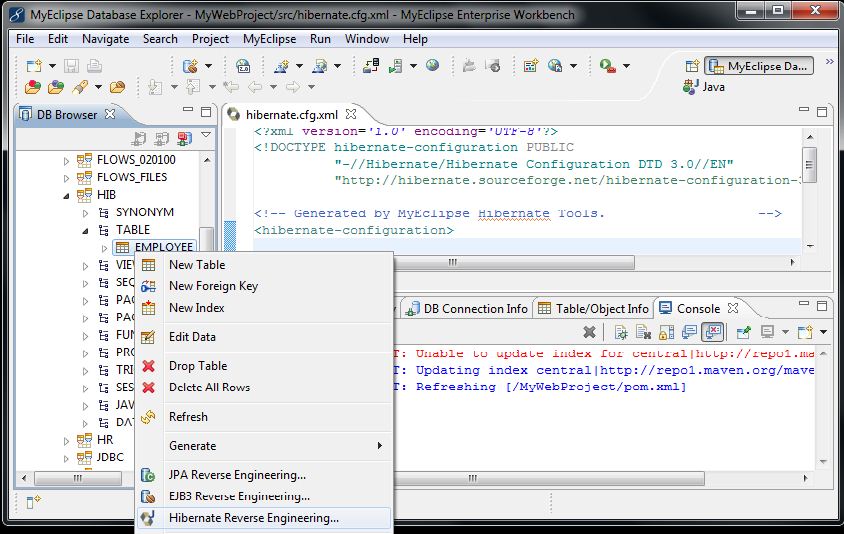 |
| Fig: generating POJO classes and HBM files |
Working with MyEclipse IDE
IDE (Integrated Development Environment):
There are so many IDE's available in market, some of them are:
There are so many IDE's available in market, some of them are:
Every IDE contains Editors, compilers, servers, browser, console etc..., If we use IDE, we no need to take the help of any external tools. Now let us know how to work with MyEclipse IDE.
When we start MyEclipse IDE, it asks for workspace folder, as shown in the figure1. We can provide any folder as Workspace folder.
 |
| MyEclipse IDE Startup screen |
When we supply the workspace folder in the back IDE creates a folder whose name is .metadata. This folder contains all the files related to IDE. We should no modify these files. When we carryout any operation on IDE it will be recorded in .metadata folder.
Procedure to create a project in MY ECLIPSE IDE:
Step1: File ==> New ==> Project |
| Fig: To open new project in MyEclipse IDE |
 |
| Fig: Select from List of projects |
 |
| Fig: Enter the project Name and Finish |
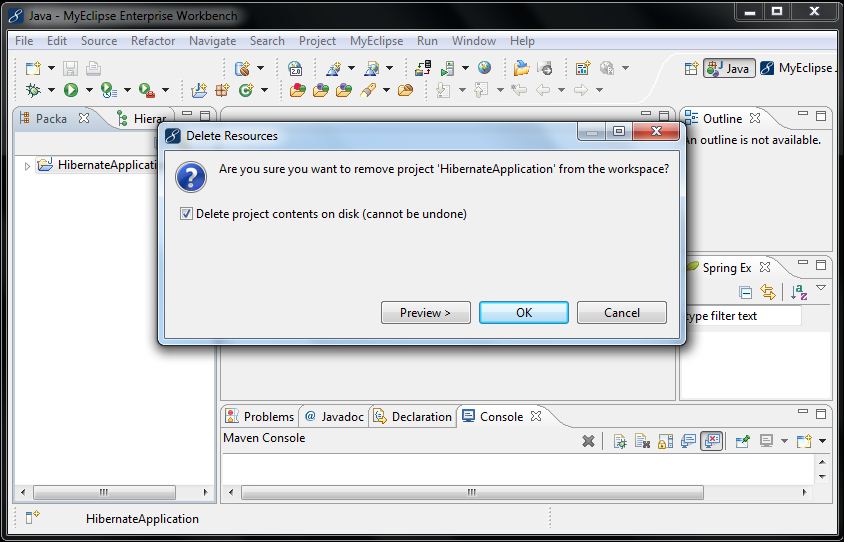 |
| Fig: Delete Project |
Procedure to create a Web Based Application:
Now let us see how to build a web based project using MyEclipse IDE. The following are the steps to follow:
Step1: File à New à WebProject
Step2: The above step displays a dialogue box, Enter projectName in that and make sure that ProjectName and Web Root Folder name is same and click on Finish.
 |
| Fig: WebProject |
Step1: Goto server view, right click and select an option Choose Server Connector, as shown in figure:
 |
| Fig: Server View |
Step3: To add the project to the server, just right click on the server, choose the option add deployment.
Procedure to configure IDE to interact with Database Server:
Step1: Open MyEclipse Database Perspective. |
| Fig: Database Perspective in MyEclipse |
 |
| Fig: Add Database |
 |
| Fig: Add Database server |
Introduction to Hibernate

Comarision with JDBC:
- In JDBC once if the connection is established with the database server, and if we do not close it, then we get a problem saying maximum number of cursors exceeded. To resolve this problem we use connection pool. If we use framework like hibernate internally they uses connection pool.
- In Real time projects we always divide the projects into multiple parts. Some programs are responsible to retrieve data from DBServers and some are responsible to display them. But in JDBC ResultSet object(rs) is not transferable. This problem can be resolved by using Hibernate or JPA frameworks.
- In JDBC every method throws an unreported exception, due to this the JDBC code becomes huge. But in Hibernate no method throws an unreported exception.
- If we develop a project to communicate with DBServer using JDBC, we need to take care of queries. This is because some queries are specific to some databases, they will not work for all the DBServers. This problem is resolved in Hibernate by introducing HQL queries. HQL queries interact with any DBServers.
- In real time projects, we always create tables with Primary keys, by using JDBC we have to write huge amount of code to generate the value for Primary key. But in Hibernate, its internal code takes care of generating primary key values.
- In JDBC we have write the code to take care of Transactions, In Hibernate, the internal code will take care of Transactions.
 |
| Fig2: Architecture of Hibernate. |
Hibernate is an ORM(Object Relational Mapping) tool. In market we have so many ORM frameworks like: JPA(Java Persistence API), JDO(Java Data Object), SDO, Toplink etc..., In Database Servers we represent the data in the form of Relational tables. The representation of Relational data(Tables) in the form of Objects is called as Object Relational Mapping.
 |
| Fig: ORM representation |
Subscribe to:
Posts (Atom)